

You may have come across differing opinions on the necessity of submitting your website to search engines. While it’s true that verification isn’t strictly necessary for indexing, doing so can significantly boost your website’s traffic.
Fortunately, submitting a website or single URL to search engines is a straightforward and speedy process. In this article, we’ll walk you through the step-by-step process of submitting your website for verification to Google Search Console, helping you increase your online visibility and reach a wider audience.
Why Should Search Engines List my Websites?
Google’s robots continuously crawl the internet, indexing numerous websites and searching for links to new, informative content. While it’s possible to wait for Google’s crawlers to automatically discover your website, this approach can be time-consuming, taking anywhere from days to years.
But do you have time to wait? Why let chance dictate when your website will be discovered when you can take matters into your own hands? Manually submitting your website to Google Search Console is a quick and effortless process that can significantly accelerate the discovery process. By taking the initiative, you can ensure your website gets indexed faster, increasing its online visibility and potential for attracting more traffic. So, why wait?
Submitting your website to Google Search Console offers numerous benefits that can enhance your online presence and drive more traffic to your site. Here are some compelling reasons to take advantage of this free service:
- Helps Google understand your website’s update frequency, ensuring timely indexing and crawling.
- Provides free access to valuable insights, including ranking data, traffic, and webpage errors.
- Allows you to submit additional information, such as ranking your pages by importance, to help Google better understand your site’s structure.
- Keeps you informed about the latest SEO news and updates from Google.
- Ensures your website appears in search results, increasing visibility and potential traffic.
- Facilitates faster discovery, indexing, and ranking by search engines like Google.
With Google, Bing, and Yahoo dominating 96% of the search engine market share, submitting your website to Google Search Console is a simple yet effective way to boost your online presence. By doing so, you and your business have everything to gain and nothing to lose.
When is the Best time for me to send my Website to Google?
It’s highly recommended that you submit your website to Google as soon as you register your domain name. This proactive approach enables you to:
- Initially submit your entire website URL
- Subsequently submit individual pages as you add or update them
Keep in mind that search engines consider content quality and timeliness when ranking pages. Periodically updating older pages with fresh, relevant information can improve their ranking. While it’s not necessary to resubmit your sitemap every time you make a change, it’s a good practice to resubmit it periodically, especially if you’re frequently adding new content to your website.
Now that you understand the optimal timing for submitting your website, let’s dive into the step-by-step process of submitting your website to Google and other search engines.
How to Submit your Website to Google and other Search Engines
Before you go any further, make sure you remember the following:
- Access to your website’s backend or control panel.
- Access to your domain name provider account (e.g., WordPress, Bluehost, GoDaddy).
If you encounter any issues or don’t have the necessary access, reach out to your website developer or hosting provider for assistance. In the next step, you’ll need to input verification information into your website’s backend or domain provider’s control panel to confirm ownership of your site.
Read more: How to Submit Your Site to Bing Webmaster Tool: Step-by-Step Guide
Now that you’ve verified ownership of your website, follow these steps:
- Open a new window and navigate to Google Search Console.
- Create a Google Search Console account, which will provide valuable insights into your site’s search traffic, performance, and issues.
Google Search Console is a valuable tool that helps you monitor your site’s search traffic, identify and fix visibility issues, and optimize your site’s appearance in Google search results, ultimately improving your online presence. The primary benefit of Google Search Console is the ability to submit your website to Google for indexing.
Here are the step-by-step instructions to submit your site to Google Search Console for indexing. To add a site to your Search Console account, you’ll need to verify ownership. Google offers two ways to do this:
- Domain property: Verify ownership of an entire domain (e.g., example.com)
- URL prefix property: Verify ownership of a specific branch (e.g., example.com/clothing/)
If you’re adding a website property for the first time, the most common verification method is by checking your DNS record. To get started, click on “Start now” and follow the prompts to verify your website ownership.

Step 1: Add a Property to Google Search Console
To add your website to Google Search Console:
- Click on the “Search property” dropdown menu.
- Select “Add property” from the menu.
To add your entire website, simply enter the URL of your homepage in the required field.
Example: Enter the URL of your homepage: https://www.example.com
This will add your entire website to Google Search Console, allowing you to monitor and manage its performance.

Refer to the image above, which displays the Add Property feature. To add your entire website, simply enter the URL of your homepage in the following format:
Enter your website’s homepage URL in this field to add it to Google Search Console.
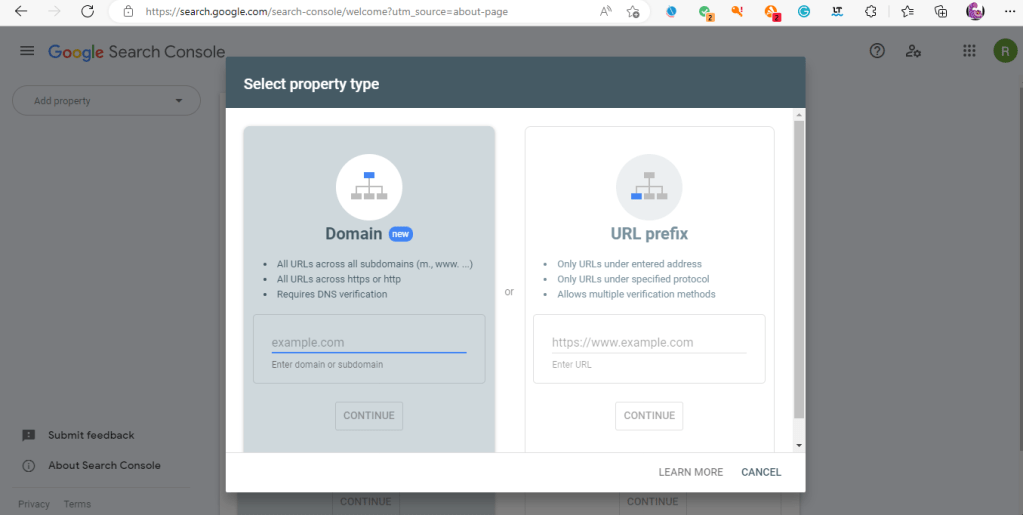
2. Step 2: Selecting the Property Type
After clicking the “Add Property” feature, you’ll be presented with two options:
- Domain: Enter your website’s domain name (e.g., example.com)
- URL prefix: Enter a subdomain or a specific URL prefix (e.g., subdomain.example.com or example.com/blog)
This step offers more flexibility in authentication options, allowing you to choose the best approach for verifying your website’s ownership

Step 3: Verifying Domain Ownership with WordPress as DNS Provider
If you chose to add a domain and selected WordPress as your DNS provider:
- Click “Start verification”
- Grant Google access to your DNS account on WordPress.com
The verification process will begin automatically. Simply wait for it to complete, then you can safely close this tab.

Note: Make sure you’re logged in to your WordPress account to facilitate a smooth verification process.
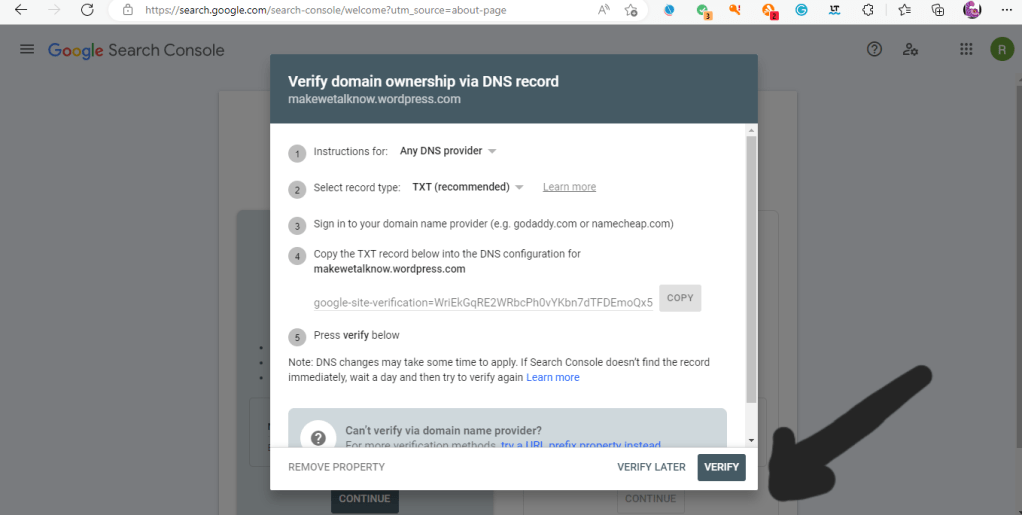
Step 4: Verifying Domain Ownership with Any DNS Provider
If you chose the “Any DNS provider” option:
- Google will provide a unique TXT record for verification.
- Copy the TXT record provided by Google.
To verify your domain ownership, follow these steps:
- Log in to your DNS provider’s control panel (e.g., GoDaddy, WordPress).
- Create a new TXT record.
- Copy the provided TXT record and paste it into the required field in your DNS configuration.
- Save the changes.
Once you’ve completed these steps:
- Return to the Google Search Console verification page.
- Click the “Verify” button.
Google will automatically detect the TXT record and verify your domain ownership, completing the process.
Step 5: Adding the Google Verification TXT Record
- Log in to your domain name provider’s website (e.g., GoDaddy, WordPress).
- Navigate to the DNS management or domain management section.
- Locate the page where you can edit your DNS records.
- Add a new TXT record and paste the Google verification TXT record into the required field.
Typically, you’ll find the DNS management section under:
- Domain Manager (GoDaddy)
- DNS & Nameservers (WordPress)
- Domain Settings (other providers)
Consult your provider’s documentation if you’re unsure where to find this section.
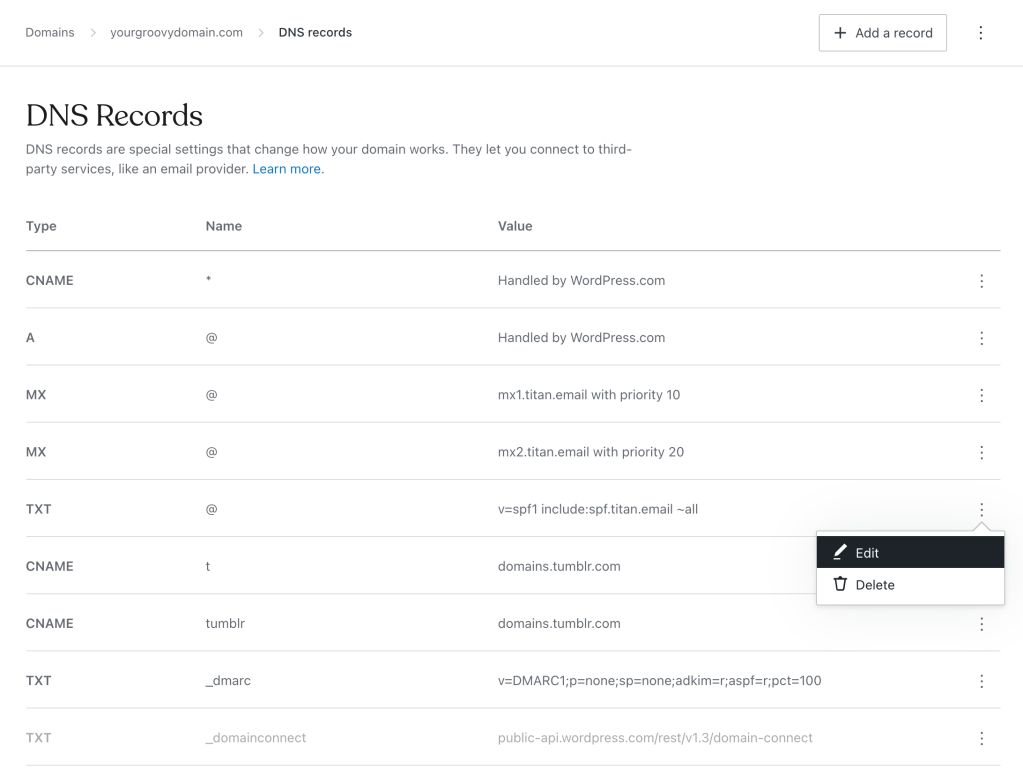
How to edit your DNS record and add the Google TXT record
First to view your DNS record:
- From your sites’ dashboard, go to Upgrades → Domains to see all the domains that site is connected to.
2. To access the DNS records, click on the domain and then on ‘DNS records.’

3. You will be presented with a list of the current DNS records. You can make changes by clicking on Manage.

Adding Custom DNS Records on WordPress.com
WordPress.com allows you to add the following custom DNS records:
- A records: Map a domain to an IP address. (See link for more information.)
- AAAA records: Map a domain to an IPv6 address.
- CNAME records: Map a subdomain to another domain.
- MX records: Route email to a specific mail server. (See link for more information.)
- TXT records: Verify domain ownership or set up SPF records.
- SRV records: Define the location of services such as VoIP or chat servers.
To add a custom DNS record, follow these steps
To Create a New DNS Record, Follow the Steps Below:
- From the upper-right corner, select the Add a record button.

2. Select the DNS record type from the Type dropdown.

3. Fill in the rest of the information you got from the service you’re adding the record for. Depending on the type of record you are trying to add, the fields will change.
How to Edit or Remove DNS record
To edit or remove an existing DNS record, click the three dots next to an existing record and select either Edit or Delete.
After you add the TXT record to your DNS configuration, switch back to Google Search Console and open your Unverified Property. Click the Verify button.
Within 24 hours, you should be able to confirm whether you’re verified.
Remember, do not remove the verification code, even after you’re verified. Google’s crawlers check your site regularly to make sure it’s still verified.
Verification by Using HTML tag
Another method to verify your account is to copy the meta tag given to you and paste it into your site’s homepage. It should go in the <head> section, before the first <body> section.

By copying the meta tag given to you by Google, you can put it in the source code of the head <head> of your website. If you are using WordPress, It will look like this:
Log in to your WordPress website, and navigate to SEO > Dashboard:

Paste the HTML code you just copied into the Google Search Console box.

Make sure to click on Save changes when you’re done.

Finally, return to the Search Console and click on the ‘Verify’ button. You’ll get a success message saying you can use the tool with your website.
If that doesn’t work, you can find a free plugin’s website that will add your meta tag to the correct location.
Furthermore, adding more code to your website will cause your site speed to be slowed and affect your ranking in the search engines.
Find additional methods to verify your domain on Google Search Console here.
Submitting Your XML Sitemap to Google
Now that your Google Search Console account is verified, it’s time to submit your XML sitemap. This helps Google:
- Improve crawling and indexing of your site
- Discover important pages on your site that might be difficult to find
- Understand your site’s structure and content
What is an XML Sitemap
An XML sitemap is a crucial file for SEO that lists the content on your website. It informs Google about:
- The structure and organization of your website
- The importance and priority of each page
- The frequency of updates and changes
Some website platforms, like WordPress, automatically generate an XML sitemap. However, if you’re using multiple content delivery systems, creating a sitemap can be more complex. If you have an automatically generated sitemap, and you want to locate your XML Sitemap, you can usually find it at www.(yourwebsite).com/sitemap.xml.
If you’re using a hosting service like WordPress, follow these steps to locate your sitemap:
1. On the left side of the side menu, click on Tools and then Marketing.

2. Next, click on Traffic and if you scroll down below, you will find your XML Sitemaps

3. Once you’ve identified your XML sitemap, the next step will be to input it in your Google Console Account. Simply clink on Sitemaps.

4. After clicking on sitemap, copy and paste your XML Sitemap into the box and click on submit.

And you’re done!


Leave a comment