

Submitting your website to Bing Webmaster Tools is a straightforward process that can help improve your site’s visibility and search engine ranking. In this article, we’ll walk you through the simple steps to submit your site to Bing Webmaster Tools. To get started, you’ll need to create a Bing Webmaster Tools account, where you can add and manage your websites. Similar to Google Search Console, you’ll need to verify ownership of your site (or specific sections of it) to add it to your Webmaster Tools account. When adding a site, you have two options:
- You can create a property that encompasses the entire domain
- You can create a property that is limited to a single branch
There are two ways to add a site to your Bing Webmaster Tools account, which we will explore in detail below.
1. You can import sites from Google Search Console
If you have a verified Google Search Console account, you can seamlessly import your sites into Bing Webmaster Tools. This convenient feature allows you to transfer settings, user details, and properties directly from Google Search Console to Bing.
To initiate the import process, Bing Webmaster Tools requires permission to access your Google Search Console account information. Once granted, Bing Webmaster Tools will display a list of sites from your Google Search Console account, including associated Sitemaps and their respective roles.
From this list, you can select the sites you wish to add to Bing Webmaster Tools and click “Import.” Upon successful completion, the selected sites will be automatically added and verified in Bing Webmaster Tools, streamlining the process and saving you time.
2. You can add your site manually
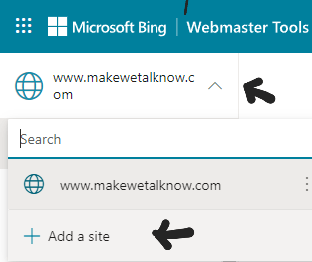
You can also add sites by typing the URL in the input box and clicking add.

If you’re an existing user, add a site from the top left navigation panel and follow the same steps.
After adding your site to Bing Webmaster Tools, Microsoft’s systems typically require 48 hours to generate analytics and data.
Managing Added Sites
You can remove an added site from the left navigation menu by selecting “More options.” Bing Webmaster Tools will periodically verify ownership of the site through your Search Console account. During this validation process, any new sitemaps discovered on your Search Console account will be automatically imported into your Bing Webmaster Tools account.
Connected Search Console Accounts
You can view a list of connected Search Console accounts under the “Profile” section. If you wish to revoke access, select the “Disconnect” option.
Import Limits
Bing Webmaster Tools allows for the import of up to 100 websites at a time. To import more sites, simply repeat the import process. Please note that the overall site addition limit of 1000 sites still applies.
Read more: How to Submit Your Website to Google Search Console: Step-by-Step Guide
How to Verify ownership of your website in Bing Webmaster Tools
To complete the process of adding a new site to your account, you’ll need to verify ownership by providing proof. Bing Webmaster Tools offers four distinct methods for ownership verification. Simply follow the on-screen instructions to select the most suitable option for your site:
We’ll explore each of these verification methods in detail, helping you choose the best approach for your website.
1. Via DNS auto verification
Bing Webmaster Tools supports the Domain Connect standard, streamlining the verification process for site owners. With Domain Connect, Bing Webmaster Tools can automatically detect your DNS provider and handle the CNAME insertion process. To verify your site ownership using Domain Connect:
- Log in to your DNS account.
- Bing Webmaster Tools will automatically add the CNAME to your DNS account.
Please note that this verification option is only available for DNS providers that have adopted Domain Connect and partnered with Bing. Once you sign in to your DNS provider’s website, your website will typically be verified in Bing Webmaster Tools within a few seconds. In some cases, verification may take longer due to the time required for the DNS provider to send the site ownership signal to Bing Webmaster Tools.

2. Via XML File validation
Another verification option involves downloading the BingSiteAuth.xml file, which contains your unique ownership verification code. To complete the verification process:
- Download the BingSiteAuth.xml file and save it to your computer.
- Upload the file to the root directory of your registered website.
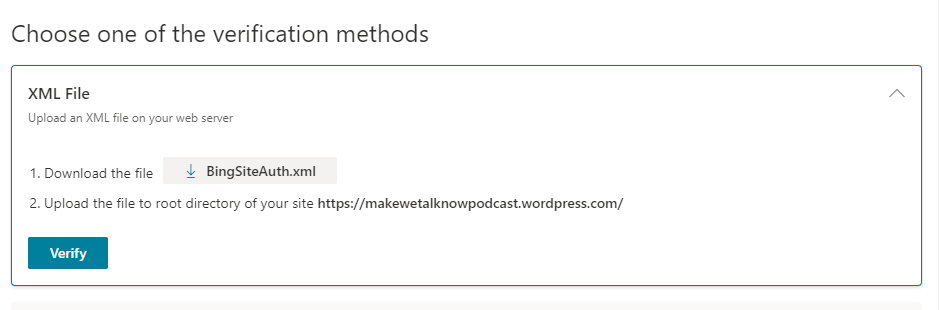
By successfully uploading the XML file, you’ll confirm your site ownership and complete the verification process in Bing Webmaster Tools.
3. Via adding HTML Meta tag to your site homepage
Another ownership verification method involves adding a custom meta tag to your site’s default homepage. To complete this process:
- Copy the provided meta tag verification code.
- Open your website’s default page in your web development environment’s editor.
- Paste the code at the end of the section, ensuring it is followed by a closing tag (>).

By successfully adding the meta tag, you’ll confirm your site ownership and complete the verification process in Bing Webmaster Tools.
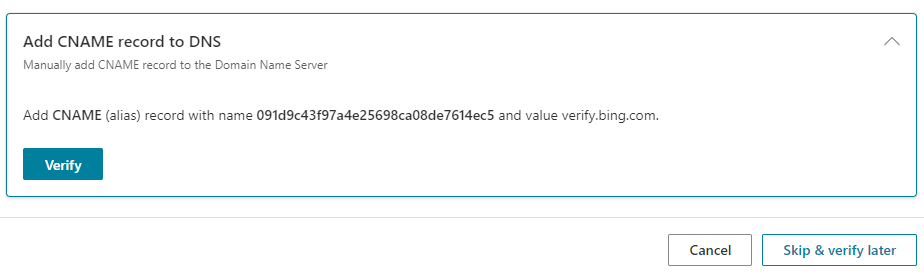
4. By adding CNAME record to DNS
This verification option requires access to your domain hosting account. To complete the process:
- Access your domain hosting account and update the CNAME record.
- Enter the verification code provided by Bing Webmaster Tools.
- Return to the Bing Webmaster site and click “Verify.”
Bing will then be able to verify your site ownership by detecting the updated CNAME record.
Since Yahoo shares the same indexing tool with Bing, submitting your website to Bing Webmaster Tools will also submit it to Yahoo. Once you’ve completed process, you’ll be all set to manage your site’s presence on Bing and Yahoo.


Leave a comment